digital storytelling
| hypermediajvstorytelling.pptx |
1. Topic- Creating a PowerPoint multimedia presentation, a looping presentation, or movie of apx. 3-10 minutes in length. A teaching and learning tool.
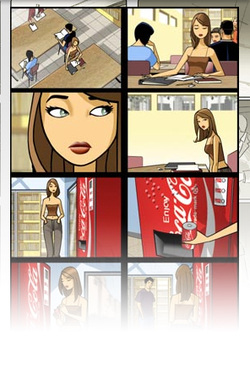
Example of a Looping Slide show:
| hypermedia-jvspanish.ppt |
Mrs. Villareal worked on the looping slide show presentation example above and played it on her projector during a recent open house at Wood Hill. The presentation showed visual examples of the work and projects that she and her students studied all year long. Projects such as: a Spanish language fashion show, Spanish language and Spanish country service projects, and art work for the “day of the dead.” This presentation served as a great backdrop for Mrs Villareal and enabled her to speak to the many visiting parents and served as a constant subject for conversation.
2. Practices That Help Create Good Presentations
3. Establishing a Purpose
4. Assembling Content-
5. Begin Creating a PowerPoint Presentation-
Open PowerPoint, then go to File> Create New Presentation, then click on the Themes Tab to choose your background slide.
2. Practices That Help Create Good Presentations
- Establish a purpose or theme early on and maintain a clear focus throughout.
- If using type for title pages - make sure that you use a simple readable font (San Serf) such as Arial or Optima
- Audio should be clear and mixed well
- Lining up photographs in a similar and consistent manner from one frame to the next
3. Establishing a Purpose
- What is purpose of creating this presentation?
- What are the key project guiding questions if any?
- What are the learning targets if any?
- What are the Deliverables?
4. Assembling Content-
- Content can be: photographs, movies, audio voiceovers, interviews, music, and screen captures
- Research and gather information and digital files (images & audio etc)
- Subject matter can be anything being studied: Ancient Greece, snow flakes, the water cycle etc
- Storyboarding your presentation. Storyboarding is the process of creating a visual script, or draft, of the shots and scene changes in a project. A storyboard provides a visual layout of events as they are to be seen. And in the case of interactive media, it is the layout and sequence in which the user or viewer sees the content or information. Storyboarding Template, tutorial, and Storyboarding see below.
5. Begin Creating a PowerPoint Presentation-
Open PowerPoint, then go to File> Create New Presentation, then click on the Themes Tab to choose your background slide.

- Going from left to right - On the left hand side you will see Page Setup this will allow you to choose different slide sizes. Choose either Widescreen 16:9 or Widescreen 16:10 from the pull down arrow.
- Then to the right of that - you can choose your slide color. Keep it simple at first use black or white for your background. Later on go all the way to the right and choose background this pull down arrow will enable you to create a custom colored background.
- Click on the Transitions Tab as seen below:

- Fade and Dissolve are good Transitions that don’t distract but blend one image to the next. If you look above you will see that each slide transition will take one second in duration (practice and figure out what works best for you) and each slide will advance after being on the screen for two seconds. The Apply To All Slides is a time saver – this will make all the slides appear on the screen for the same amount of time and transitions will all be uniform.
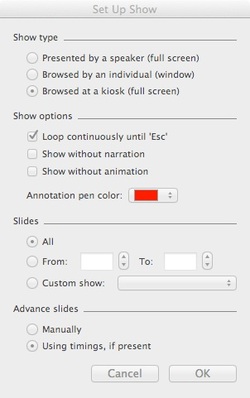
To make your presentation loop, or run, continuously go to: Slide Show>Set Up Show. Check off the following: Browsed at a Kiosk (Full Screen), Loop continuously until ‘Esc,’ Using timing, if present. This will ensure your presentation is shown at full screen, automatically advances the slides, and loops or plays non-stop until you want it to stop.
6. Saving Your Project
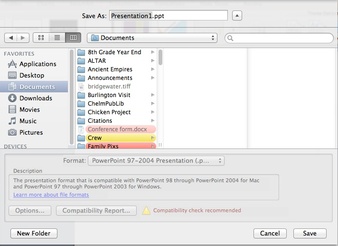
Go to File> Save As. In the Format area use the pull down and choose PowerPoint 97-2004. In that way even people with an older version of PowerPoint can play your presentations.
Go to File> Save As. In the Format area use the pull down and choose PowerPoint 97-2004. In that way even people with an older version of PowerPoint can play your presentations.
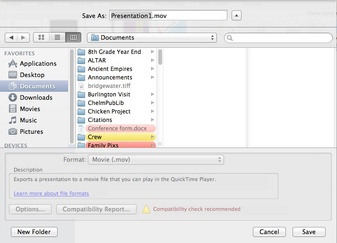
If you’d like to save your presentation as a movie go to File> Save As Movie and will turn your presentation into a movie
7. At the End - View Your Presentation and Then Ask Yourself “Have you met your objectives?”
8. Closure-
Presenting your presentation
Placing your presentation on a website
Showing presentation during a school open house or other event
Further Resources
http://www.microsoft.com/Education/en-us/teachers/plans/Pages/index.aspx
http://www.youtube.com/watch?v=2-ntLGOyHw4&feature=player_embedded
7. At the End - View Your Presentation and Then Ask Yourself “Have you met your objectives?”
- Was the purpose maintained with a clear focus throughout
- Was the subject was brought to life
- Have the key project guiding questions answered
- Have the learning Targets met
- Have the deliverables met
8. Closure-
Presenting your presentation
Placing your presentation on a website
Showing presentation during a school open house or other event
Further Resources
http://www.microsoft.com/Education/en-us/teachers/plans/Pages/index.aspx
http://www.youtube.com/watch?v=2-ntLGOyHw4&feature=player_embedded
Storyboards
Storyboarding Explained
Well planned videos and projects look the most professional. Storyboarding is the process of creating a visual script, or draft, of the shots and scene changes in a project. A storyboard provides a visual layout of events as they are to be seen through the camera lens. And in the case of interactive media, it is the layout and sequence in which the user or viewer sees the content or information. This tutorial explains the storyboarding process, outlines the most common items found on a storyboard, and aims to provide guidelines for you to create your own.
Storyboards are invaluable when several people are working on a project together. A well-defined storyboard helps to ensure that everyone understands the goals of the project and how the video and audio footage should work together. However, if you're working alone, they also serve as visual reminders during the filming and editing stages. Remember, storyboards are not set in stone and can be revised as needed.
• You may find some of the following sections too detailed for your purposes, or you may decide you need to include some additional elements in your storyboard.
Whatever type of production you’re planning, bear in mind that the more detailed and specific your storyboard, generally the easier the production and post-production phases will be.
The storyboarding process is an important one for the following reasons:
• To deliver its message effectively, a video or film production needs to be well planned. Even a family event video will benefit from planning.
• Storyboarding helps you to think about how you want your finished film to look, how the story should unfold, and what shots will best convey your story to your audience.
• With your storyboard in place, you’ll waste less time setting up shots because you’ll know exactly what scenes you need to shoot, and where to shoot them from.
Storyboarding is especially useful for planning complex sequences of events, saving you from shooting footage you can’t use or missing footage that is essential to the plot.
Components
When creating a storyboard, think of your video as a story comprising various elements in a timeline. For each major scene, you should include information about who the subject is, what they are doing, where and why they are doing it, and so on.
If you know the location where you will be shooting, it’s a good idea to sketch a rough plan view showing the placement of the camera, light source, people, and any other important features or props.
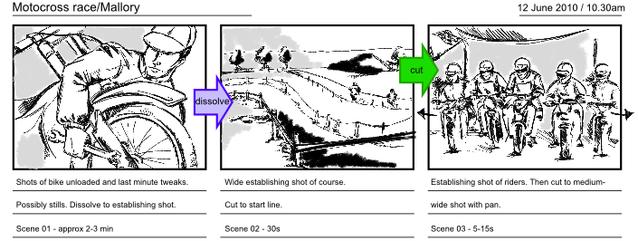
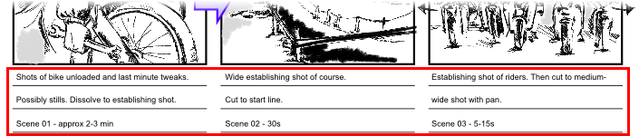
Include sketches of important scenes, along with scene descriptions, and notes about location, transitions, plot, dialogue, and sound effects.
Draw arrows from one scene to the next where you are likely to makes edits. Write the type of transition you will use between each scene and/or color-code the arrows.
If you know the location where you will be shooting, it’s a good idea to sketch a rough plan view showing the placement of the camera, light source, people, and any other important features or props.
Include sketches of important scenes, along with scene descriptions, and notes about location, transitions, plot, dialogue, and sound effects.
Draw arrows from one scene to the next where you are likely to makes edits. Write the type of transition you will use between each scene and/or color-code the arrows.
Synopsis
At the top of your storyboard, write a short paragraph outlining the story or event that your video is going to capture. You could also include character profiles and any other issues related to the story.
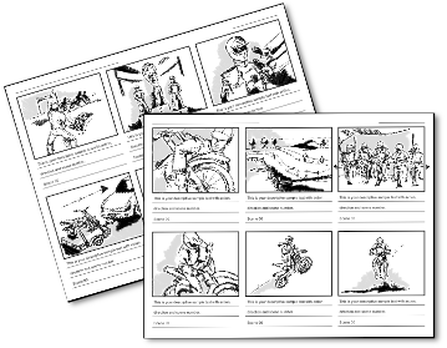
Sketch

The example on the left shows a typical storyboard template. The blank ‘boxes’ are for sketching a rough representation of the main scenes that you want to capture during shooting. The lines below are for text and other information such as music.
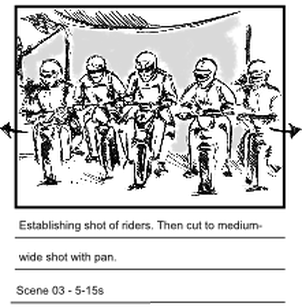
Your sketches do not have to be detailed, (it's not an art contest!), but they need to be accurate enough so that you understand the type of shot required. If you want a close up, draw it! You can use arrows to depict camera panning and angles. You don’t have to be an artist to create an effective storyboard—rough sketches of stick figures will do just as well.
Try to include as much detail as possible about the scenes you want to shoot. Keep in mind also that a storyboard is a ‘live document’ and will change and evolve as your ideas develop.
Try to include as much detail as possible about the scenes you want to shoot. Keep in mind also that a storyboard is a ‘live document’ and will change and evolve as your ideas develop.
Shot Description
This section contains a description about what needs to be captured in the shot—specifically, anything that is difficult to explain in a single sketch. Such as photographs, audio, music, sound effects, narration, camera shot or angle.
Transitions
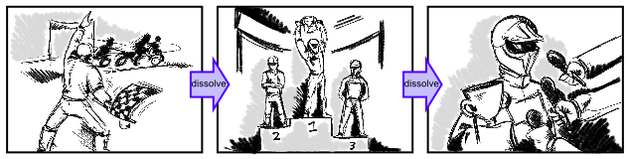
Identify your scene transitions (how you move from one shot to the next) in your storyboard. This will make the editing phase much easier, and will help you to determine if you have enough variation between shots.
For example, if you have the same type of shots following each other (a medium shot followed by another similar medium shot), you need to ensure that this won't be confusing for your audience. Don't use fancy transitions just because you can, use them when it will benefit the audience!
For example, if you have the same type of shots following each other (a medium shot followed by another similar medium shot), you need to ensure that this won't be confusing for your audience. Don't use fancy transitions just because you can, use them when it will benefit the audience!
Audio
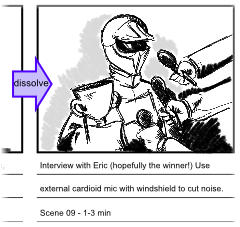
Primary audio - As you capture your video footage, you can also simultaneously record your audio. If you’re using an external microphone, make a note of when it should be used.
Background audio - You should also note any scenes in which you don’t want any sound recorded, and those where background audio is required. For example, at a track and field event, you might want to record the sound of the starter’s gun, some crowd noise, applause, and so on.
Background audio - You should also note any scenes in which you don’t want any sound recorded, and those where background audio is required. For example, at a track and field event, you might want to record the sound of the starter’s gun, some crowd noise, applause, and so on.
Shot Types
Free storyboarding software:
http://www.atomiclearning.com/storyboardpro
http://www.newfreedownloads.com/find/storyboard.html
http://www.freefilmsoftware.co.uk/
http://www.bobsedulinks.com/software.htm
http://www.atomiclearning.com/storyboardpro
http://www.newfreedownloads.com/find/storyboard.html
http://www.freefilmsoftware.co.uk/
http://www.bobsedulinks.com/software.htm
